China Best How to Bleed Brakes Yourself Without a Kit?

Time:2026-10-22 Author:Mason
0%

Brake fluid looks harmless in a clear reservoir, yet a small air bubble can change pedal feel dramatically. For drivers searching “How to bleed brakes by yourself without a kit,” the real challenge is controlling contamination, pressure, and fluid disposal. This task is possible on some vehicles, but it is not universally suitable for beginners.

NHTSA’s Traffic Safety Facts series and public recall database consistently identify braking performance as a safety-critical concern. Their findings support a simple principle: a firm pedal matters more than a quick repair. FMVSS No. 116 also classifies brake fluids by performance requirements, including boiling points and chemical stability. Follow the vehicle manufacturer’s specified DOT grade.

Experience helps here.

A clean hose, a transparent container, and fresh fluid can reveal bubbles or dark contamination near the caliper. However, a worn master-cylinder seal, seized bleeder screw, or ABS hydraulic unit may imitate ordinary trapped air. I have seen people pump the pedal aggressively and create confusion instead of pressure. That mistake deserves attention. Some systems require a scan tool or a prescribed bleeding sequence, especially after ABS component replacement. A home method cannot replace the service manual or a professional inspection.

This guide will explain practical preparation, pedal-control techniques, fluid-level checks, and warning signs that require stopping. It will also discuss common errors, including opening the wrong valve, allowing the reservoir to run dry, and reusing contaminated fluid. Brake work rewards patience. After bleeding, confirm pedal firmness, inspect every connection, and perform a controlled low-speed test away from traffic. If the pedal remains soft, do not drive normally; arrange qualified service.
China Best How to Bleed Brakes Yourself Without a Kit?

Brake Bleeding Basics: FMVSS 116 DOT 3 and DOT 4 Fluid Standards

China Best How to Bleed Brakes Yourself Without a Kit?

Brake bleeding removes air and moisture from hydraulic lines. FMVSS 116 sets important minimum standards for brake fluids. DOT 3 requires a minimum dry boiling point of 205°C and wet boiling point of 140°C. DOT 4 requires higher minimums: 230°C dry and 155°C wet. These figures come from the U.S. Federal Motor Vehicle Safety Standard, not informal workshop advice. SAE J1704 also defines performance requirements for glycol-based brake fluids.

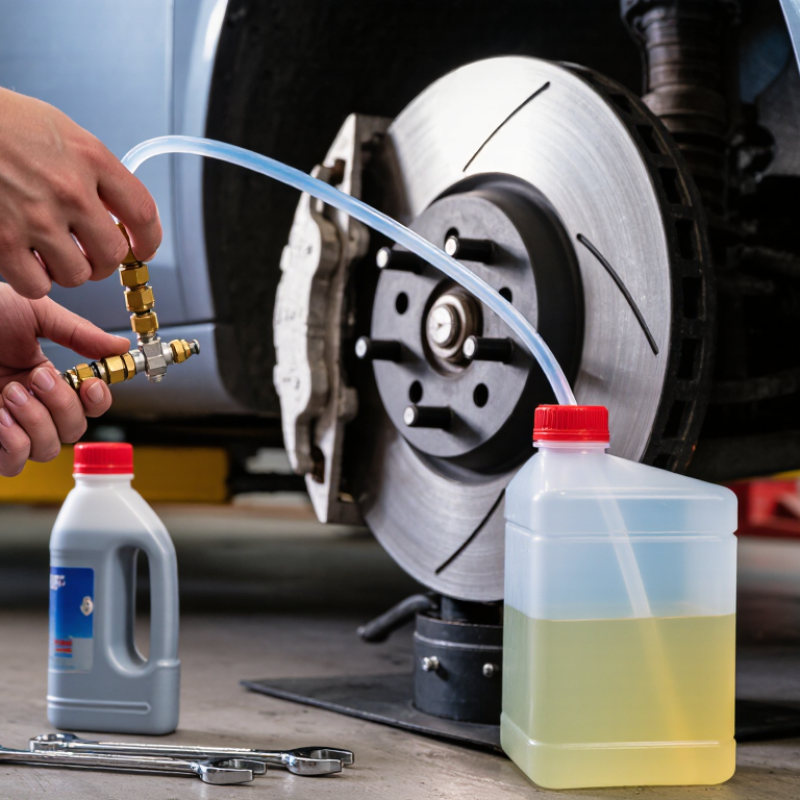
A two-person method can work without a bleeding kit. Use the vehicle manual to confirm the fluid type and wheel sequence. Keep the reservoir nearly full with fresh fluid. Attach a clear tube to the bleeder screw, then place its end in a partly filled container. One person presses the pedal slowly, while the other opens and closes the screw. Repeat until bubbles disappear and the fluid looks clean. Never pump aggressively with an empty reservoir. Air can return through the master cylinder.

The process sounds easy. It is easy to rush. A soft pedal after bleeding may indicate trapped air, a leak, or incorrect adjustment. DOT 4 is not automatically suitable for every vehicle, even though it often exceeds DOT 3 boiling points. Never mix fluids based only on temperature ratings. FMVSS 116 test values describe fluid performance under controlled conditions, not the actual condition inside an old braking system. Wear gloves, protect painted surfaces, and dispose of used fluid through an approved waste service.

Safety Preparation: Jack Stands, Correct Fluid, and 3–5 mm Bleeder Hose

Bleeding brakes without a kit begins with safe preparation. Park on level ground, engage the parking brake, and support the vehicle with rated jack stands. Never work beneath a car held only by a jack. Remove the wheel if access requires it, then locate the bleeder screw on the caliper or wheel cylinder.

Use only the brake fluid specified in the vehicle manual. Different fluid types may not be compatible, and dirty fluid can damage hydraulic components. Keep the reservoir filled during the entire process. If it becomes empty, air can enter the master cylinder and create extra work. A clean container and a transparent 3–5 mm internal-diameter hose are useful. The hose should fit tightly over the bleeder nipple, with its free end submerged in a small amount of clean fluid.

Have a helper press the pedal slowly while you open and close the screw. The usual sequence is press, hold, open, close, then release. Confirm the correct wheel order in the service instructions; it can vary by vehicle. Watch for bubbles, dark fluid, or a loose hose. Do not overtighten the bleeder screw. Check pedal firmness before driving, and inspect every connection for leaks. This method is practical, but it is not perfect. If the pedal remains soft, stop and seek qualified inspection rather than guessing.

Manual Two-Person Method: Pedal Pressure, Valve Opening, and Air Removal

Bleeding brakes without a kit requires patience, a small wrench, clear hose, and a clean container. Use two people: one controls pedal pressure, while the other opens and closes the bleeder valve. Park on level ground and support the vehicle with approved stands, never a jack alone. Check the vehicle manual for the correct fluid and any ABS instructions. Wipe the reservoir cap before opening it. Keep the reservoir nearly full during the process. Cleanliness matters.

Attach the hose firmly to the bleeder valve, then place its other end inside the container. The driver pumps the pedal slowly three times and holds steady pressure. The helper opens the valve about one-quarter turn. Fluid and air bubbles should move through the hose. The helper closes the valve before the pedal reaches the floor. Only then should the driver release the pedal. Repeat this cycle until bubbles disappear. Do not let the reservoir run empty. Top it up often.

Watch the fluid closely. Clearer fluid and fewer bubbles usually show progress, but they do not prove the system is safe. Follow the wheel sequence in the manual, because layouts differ. A soft pedal after bleeding requires inspection for leaks, worn parts, or trapped air. Do not guess. I would also recheck the valve area for dampness after tightening it. Never drive with a weak pedal. Test at walking speed in a controlled area, then stop immediately if braking feels uneven or the pedal sinks. Rushing the valve timing can pull air back into the line.

Bleeder Sequence: Follow the Manufacturer’s Order, Usually Farthest to Nearest

China Best How to Bleed Brakes Yourself Without a Kit?

Bleeding brakes without a kit can work, but sequence matters more than speed. Check the service manual first. Most hydraulic systems begin with the wheel farthest from the master cylinder, then move closer. A common order is right rear, left rear, right front, and left front. Some vehicles differ, especially those with diagonal circuits or complex ABS units. Never guess.

Use fresh fluid from the specified type. Keep the reservoir above the minimum line, and attach a clear hose to the bleeder screw. The helper should press the pedal slowly, hold it, and release only after the screw closes. Watch for bubbles. One careless release can draw air back inside. The U.S. Department of Transportation’s FMVSS No. 135 sets strict passenger-vehicle brake performance requirements, showing why a soft pedal deserves serious attention. Industry service data also links moisture-contaminated fluid with reduced boiling protection, though exact limits vary by fluid type.

Tips: Work on level ground with secure supports. Do not reuse opened fluid. Tap the caliper gently to free trapped bubbles. If the pedal remains spongy after two complete rounds, stop and inspect for leaks, worn components, or ABS-specific bleeding requirements. My practical caution is simple: gravity bleeding feels easy, but it can hide air. Test the pedal firmly before moving, then perform a slow, private-area check at walking speed.

Fluid Quality Check: Replace Fluid Below 1% Air Content and Test Pedal Firmness

China Best How to Bleed Brakes Yourself Without a Kit?

A fluid quality check should guide your bleeding work, not guesswork. Use a clean, compatible tester and inspect the fluid before opening any bleeder. If the measured air content is below 1%, follow your vehicle’s service standard for replacement. Air content alone is not a complete safety diagnosis. Moisture, contamination, age, and fluid color also matter.

Keep the reservoir filled with the correct fluid during bleeding. Never let it run dry, or air may enter the master cylinder. Use a transparent hose and collect fluid in a clean container. Small bubbles should gradually disappear. I once focused too much on speed and missed a soft pedal after the job. That was a useful mistake.

Test pedal firmness with the engine off first. Press the pedal several times, then hold steady pressure for thirty seconds. It should remain firm and should not slowly sink. Start the engine and repeat the check carefully. A slight pedal movement can be normal, but excessive travel needs attention. Inspect every connection for leaks. If the pedal still feels spongy, stop driving and repeat the process or seek qualified help. Guessing is not worth the risk.

China Best How to Bleed Brakes Yourself Without a Kit? - Fluid Quality Check: Replace Fluid Below 1% Air Content and Test Pedal Firmness

DIY brake-bleeding inspection and quality-control checklist

Inspection Dimension What to Check Recommended Target or Reference Value Simple DIY Method Result to Record
Brake-fluid type Confirm the fluid specification shown on the vehicle reservoir cap or service information. Use only the specified glycol-based fluid, such as DOT 3, DOT 4, or DOT 5.1. Do not mix glycol-based fluid with silicone-based DOT 5. Read the reservoir marking and vehicle service information before opening a new container. Specification confirmed
Fluid appearance Check for dark discoloration, sediment, cloudiness, or visible contamination. Fluid should be clear to lightly amber and free of particles or water droplets. Inspect the reservoir with a clean light source. Do not rely on color alone to determine fluid condition. Clear / contaminated
Air content Evaluate whether air remains in the hydraulic circuit after bleeding. Project target: below 1% entrained air content, when measured with a suitable calibrated tester. This is a practical quality target, not a universal legal limit. Use an appropriate fluid or hydraulic diagnostic instrument if available. Without an instrument, inspect expelled fluid for bubbles and verify pedal firmness. Below target / retest
Bleeding sequence Follow the vehicle manufacturer’s wheel sequence. Use the specified order; a common sequence starts with the wheel farthest from the master cylinder and finishes with the nearest, but layouts vary. Check the service instructions. Keep the reservoir filled throughout the process. Sequence followed
Fluid discharge Observe the fluid exiting the bleeder screw through a transparent hose. The final flow should be clean and free of continuous bubbles. Attach a tight-fitting hose, open the bleeder slightly, and use controlled pedal strokes or a suitable manual bleeding method. Bubble-free flow
Reservoir level Prevent the master-cylinder reservoir from running dry. Maintain the level between the MIN and MAX marks during bleeding. Check the reservoir after each wheel or after several pedal cycles. Add the correct new fluid as needed. Level maintained
Pedal firmness Check pedal feel with the engine off and during a controlled running check. Pedal should become firm and should not continue sinking under steady moderate pressure. Press the pedal several times to remove booster assistance, then hold steady pressure for approximately 30 seconds. Stop if the pedal feels unsafe or sinks noticeably. Firm / investigate
Pedal travel Compare pedal travel with the vehicle’s normal feel. Travel should be consistent and should not approach the floor during normal braking. Perform a stationary check first, followed by a slow-speed test in a safe area. Normal / excessive
Leak inspection Check bleeder screws, hose connections, calipers or wheel cylinders, and the master-cylinder area. No wetness, dripping, or fresh fluid residue should be present. Wipe connections clean, apply pedal pressure, and inspect again. Never drive with an identified hydraulic leak. Dry / leak found
Fluid boiling-point reference Use boiling-point data as a general indication of fluid specification, not as a substitute for a vehicle-specific inspection. Minimum reference values: DOT 3 dry 205°C / wet 140°C; DOT 4 dry 230°C / wet 155°C; DOT 5.1 dry 260°C / wet 180°C. Confirm the fluid class on the container or service documentation. A boiling-point tester is required for an actual measurement. Specification recorded
Final road test Verify braking response after all tools are removed and the reservoir cap is secured. Braking should be straight, predictable, and free from abnormal noise or pedal softness. Begin at walking speed in a safe, traffic-free area. Increase speed only after the first checks are satisfactory. Pass / do not drive

Safety note: Brake-fluid service involves a safety-critical system. Wear eye protection, keep fluid off painted surfaces, use properly supported vehicle stands, and stop the inspection if the pedal remains soft, fluid leaks, or the braking response is abnormal.

FAQS

What does brake bleeding remove?

It removes air and moisture from hydraulic brake lines. Air can make the pedal feel soft.

Can I bleed brakes without a special kit?

Yes, a two-person method can work. You need a small wrench, clear hose, and clean container. Take your time.

What fluid should I use?

Check the vehicle manual before opening the reservoir. DOT 3 and DOT 4 have different performance requirements. Never choose only by boiling point.

How do two people bleed the brakes?

The driver presses the pedal slowly three times and holds it. The helper opens the valve slightly. Fluid and bubbles enter the hose. The helper closes the valve before the pedal reaches the floor. Then the driver releases the pedal.

How do I prevent air from returning?

Keep the reservoir nearly full throughout the procedure. Never release the pedal while the valve remains open. One careless release can pull air back inside.

Which wheel should I bleed first?

Follow the vehicle manual exactly. Many systems start with the wheel farthest from the master cylinder. A common pattern is right rear, left rear, right front, then left front. Some systems differ.

How can I tell whether bleeding is complete?

Bubbles should disappear, and the fluid should look cleaner. These signs help, but they do not prove the system is safe. I would still inspect every valve and hose connection.

What should I do if the pedal remains soft?

Stop driving and inspect for leaks, trapped air, worn parts, or special system requirements. Repeat bleeding only when appropriate. I would not assume cleaner fluid solved everything.

What safety steps matter during the job?

Park on level ground and use approved vehicle supports. Protect painted surfaces from spilled fluid. Wear gloves, and never rely on a jack alone. Test braking at walking speed in a controlled area.

Conclusion

How to bleed brakes by yourself without a kit starts with careful preparation and a clear understanding of brake-fluid requirements. Use fluid that meets the vehicle’s specified FMVSS 116 classification, such as DOT 3 or DOT 4, and support the vehicle securely with jack stands. Fit a clean, transparent 3–5 mm hose over the bleeder screw and place its end in a suitable container.

The manual bleeding process is safest with two people: one person applies steady pedal pressure while the other opens and closes the bleeder valve to release air and old fluid. Follow the manufacturer’s bleeding sequence, which is commonly from the wheel farthest from the master cylinder to the nearest. Continue until the fluid is clean and free of bubbles, and replace fluid if testing shows air content below the 1% quality threshold is not maintained. Finally, confirm a firm, consistent brake pedal before driving.

Mason

Mason

Mason is a seasoned marketing professional with a deep expertise in the company's offerings and a passion for driving brand awareness. With a strong background in digital marketing strategies, he has an innate ability to connect with diverse audiences and effectively communicate product benefits.......